Friday, March 23, 2007

Lenses & Perspective

Background
You might have heard some lenses described as "wide angle" or "telephoto". This article should help you get to grips with different types of lenses and what they do.

Theory
With a 35mm film camera, a 50mm lens is called a "standard" lens because it shows the same angle of view and perspective as the human eye. It's focal length is said to be 50mm. Using one of these lenses, you will see objects in the correct size and relationship to each other. Other lens types are:
  • Wide angle - below 50mm, eg 24mm
    Shows a greater angle of view in the viewfinder than 50mm, but things "seem" to be further away.
  • Telephoto - lenses above 50mm, eg 300mm
    Shows a smaller fraction of the scene than 50mm, so things "seem" to be nearer.
Some lenses have just one focal length - eg 100mm macro or portrait lenses. Others are able to zoom between two focal lengths:
  • Wide angle zoom - eg. 18-55mm lens often comes as part of a "kit" with a camera
  • Telephoto zoom - eg. 70-210mm is a zoom which might be included for taking larger images at a distance.
Conversion Factor
So far, we have been talking about lenses in relation to film cameras (35mm). With many digital SLRs, the CCD sensor it smaller in area than a 35mm negative, and this means there is a conversion factor which needs to be considered - this gives us the 35mm equivalent focal length for the lens.

For my Canon EOS 300D, the conversion factor is x1.6. Here are some common lenses that I use with it, and their 35mm equivalent focal lengths:
  • 17-85mm EF-S wide zoom -> 27-136mm equivalent with 35mm
  • 70-300mm EF telephoto zoom -> 112-480mm equivalent with 35mm
  • 50mm EF standard lens -> 80mm equivalent with 35mm
  • 100-400mm EF telephoto zoom -> 160-640mm equivalent with 35mm
Similarly, my compact camera has a lens which is 5-17mm. But the lens is much closer to the CCD sensor than it is with an SLR, so again there is a conversion factor. This time, it's x6.4, giving the zoom a 29-109mm equivalent focal length.

Examples
What effect does the focal length of the lens have on the pictures, and what are the advantages and disadvantages of using them?

Wide Angle
  • Good for use in confined spaces - where you can't "stand back" as far as you might like
  • Perspective is widened - allows you to "get more in" the picture
  • Things in the background will seem a lot further away than they do to the naked eye
  • Size of objects in the foreground are exaggerated
  • Often leads to distortion of verticals - they become curved instead of straight, and/or appear to converge
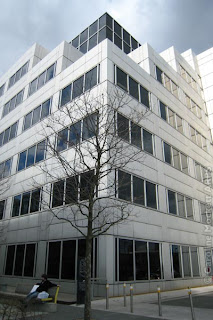
[Wide angle - 29mm equivalent focal length - taken right next to the building. It appears to lean backwards, and the verticals are converging in a triangular formation]
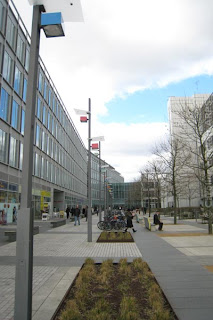
[29mm equivalent shows things in thebackground to be very small, and foreground is larger. The post on the left is also showing a curved distortion]

Telephoto
  • Good for magnifying the view - where you can't get as close as you might like
  • Perspective is compressed - things will seem to be squashed together with not as much separation
  • Things in the background will seem a lot closer than they do to the naked eye
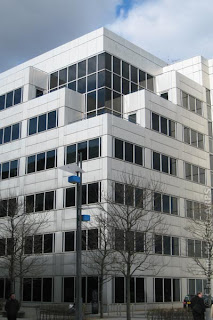
[58mm equivalent - the building looks much more natural and there is much less distortion of vertical lines]
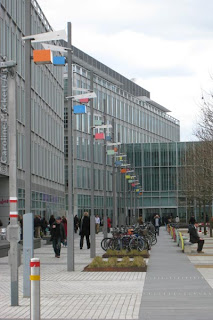
[Telephoto - 109mm equivalent, compresses perspective so the lamps apear closer together. Distant objects appear nearer than they are.]

You have probably already used the different zoom lengths on offer from your camera and lenses. But why not try taking the same subject from close to, using a wide angle, and then move further away and use the telephoto setting. This should give you some different views of the same subject to compare.

Wednesday, March 21, 2007

White Balance & Colour Temperature

Background
Have you ever wondered why the photos you take indoors sometimes come out looking very yellow? It's a common mistake to make, and this tutorial should help you understand why it happens, and how to get it right!

Theory
The human eye is very good at adjusting to different light sources, and the brain compensates without you noticing, when going from outdoors to inside. If you look at a piece of white paper under both sorts of light, you won't see any difference - but a camera will.

This effect is due to the colour temperature of the light. Here are some examples:
  • Cadle flame - noticeably orange/yellow [1850K]
  • Tungsten lightbulb - slightly yellow [2800K]
  • Average daylight - white light [5500K]
You don't need to worry about the degrees Kelvin values of the light, just that they appear to be different "colours" to film or a CCD sensor. It's this difference which affects the white balance of a picture - what the camera records as being white. Most films were biased to record white properly in daylight (daylight balanced film). Others were designed for use indoors with tungsten bulbs - tungsten balanced film.

In the digital world, we have the same issues, but most cameras will let you select the appropriate white balance (as well as guessing it with Auto WB). These are common symbols and what they mean:

daylight [daylight] shade [shade] cloudy [cloudy]
tungsten [tungsten] fluorescent [fluorescent] custom [custom]
Auto [auto white balance]
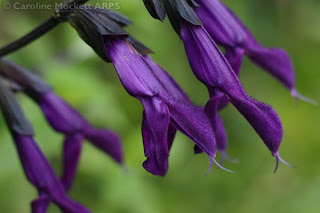
Most times, AWB makes a good guess, but if you find the picture has a colour cast, try selecting the correct white balance for the lighting. Custom lets you calibrate the camera to the lighting (for instance, if you don't know what sort the light source is). Point the camera at a piece of white paper and hit the calibrate button - then the camera will "know" what true white is supposed to look like and adjust accordingly.

Examples
So, what happens when we get it wrong? Here are some comparisons.

Tungsten Lighting
Yellow cast because "daylight" was selected under tungsten lighting:

[Tungsten light incorrectly balanced for daylight shows a yellow colour cast]

[Tungsten balance shows much more natural colours (although there's quite a lot of yellow in the picture anyway!)]

Fluorescent Lighting
These three were taken in my office (under fluorescent lighting), but deliberately selecting three different white balance settings. Using Photoshop to sample the proportions of Red, Green and Blue of the "white" paper (highlighted with the red box in each picture, just to the right of the monitor), shows which colour is difficient, causing the shift in colour. Peak white, under neutral lighting, should have a value of R: 255, G: 255, B: 255. Numbers less that that (but still pretty equal) show shades of grey - ie neutral hues.

[Daylight setting gives R:236 G:227 B:182]

Blue is much lower, hence the picture is a bit too yellow (blue and yellow are opposite each other in the colour spectrum). Although this isn't nearly as bad as the previous example, tungsten light balanced for daylight.

[Tungsten setting - gives R:220 G:228 B:246]

Now there is too much blue in the image, and the whites do have a blueish cast.

[Fluorescent setting - gives R:229 G:228 B:228]

Now we've got it right and the white paper is neutral in tones. Notice the picture on the monitor now has "blue" highlights instead of white - this is because the LCD emits light at a different colour temperature to the fluorescent lights overhead - and why we have to be careful when we take pictures with multiple light sources of differing colour temperatures. You can never get them all right in the same picture!

Even outdoors we can run into similar problems when some areas of the photo are in bright sun and others are in the shade.

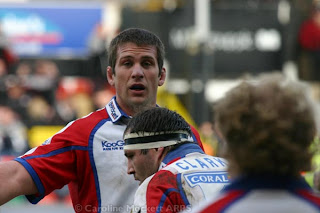
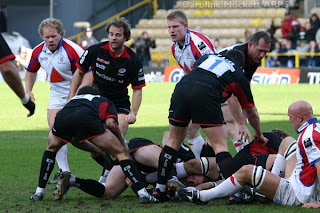
The image on the left shows a player in the shady part of the pitch. The whites in the background are neutral, but his "white" shirt has a disctinct blue tint to it. Shadow areas will always show a blue hue compared to the full sun conditions (that's why many cameras have a separate setting for it). So if you're taking a portrait in the shade and want natural skin tones, switch to the Shade setting for best results.

Why not experiment with the White Balance settings on your camera. Afterwards, it's very easy to forget and leave tungsten selected, so next time you take pictures in daylight, they will come out too blue!

Tuesday, March 20, 2007

More on Depth of Field

Background
I've already mentioned Depth of Field briefly, in my tutorial on Apertures and F-Numbers. But it's not just the aperture you are using which determines how much depth of field your pictures have.

Theory
Three factors influence the depth of field of an image. They are:
  • Aperture of lens - the f-number you use at the time of taking the image
  • Focal length of lens - eg, 28mm for a wide angle, 300mm for a telephoto.
  • Distance to subject - how far you are from the main focus of the image.
Again, this might seem complicated, but the important things to remember are these:
smaller aperture = greater DoF than larger aperture
with the same focal length and distance to subject
wide angle lens = greater DoF than telephoto lens
with the same aperture and distance to subject
greater distance to subject = greater DoF than smaller distance
with the same focal length and aperture
Examples
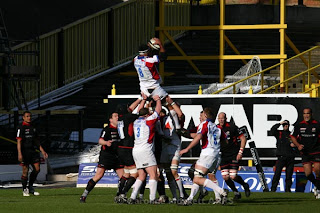
The following show three pairs of pictures, each where two of the three parameters (aperture, focal length, distance to subject) have been kept constant, and the third is varied. Hopefully, this will demonstrate the effect of each. They were taken at a recent rugby match (not specifically for this tutorial, but they illustrate the points well). Whilst I will quote the shutter speeds and ISO setting used, they actually bare no relevence to the depth of field, so are just included for interest.

Changing The Aperture
Same focal length = 400mm
Similar subject distance = about half way across the pitch

[small aperture - f/10, 1/800th @ ISO 400 - most of the image is in adequate focus, giving quite a busy appearance]

[larger aperture - f/6.3, 1/400th @ ISO 400 - background is more blurred, giving better separation from the players]

Changing The Focal Length
Same aperture = f/7.1
Similar subject distance = close to the nearest touchline

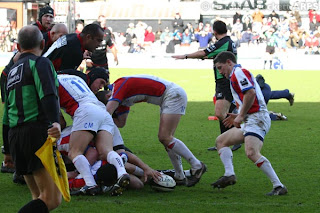
[shorter focal length - 130mm, 1/250th @ ISO 400 - everything from touch judge on left (green) to furthest player is pretty sharp]

[longer focal length - 375mm, 1/400th @ ISO 400 - nearest player is blurred (he's about the same distance as the touch judge was in the above) and the background is also very soft]

Changing The Distance To Subject
Same aperture = f/5.6
Similar focal length = about 250mm

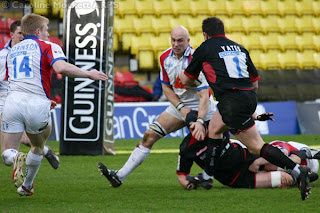
[further away - far touchline, 1/4000th @ ISO 400 - most of the image is in sharp, including much of the background. The action was about 70m away]

[closer distance - near touchline, 1/400th @ ISO 400 - background is more blurred, giving better separation. The action was about 10m away]

Checking Depth of Field
Some cameras allow you to check the depth of field you will get before you take the picture. This is usually called Depth of Field Preview. Usually, when you look through the viewfinder, the camera is using the maximum aperture of the lens to show you the image. Pressing the DoF Preview button shuts the lens down to the size of aperture it will use at the time of taking - this often results in a darker view in the viewfinder (the lens is letting in less light) but you can visibly see just what will be sharp.

Maximizing Depth of Field
There is one special point in the image, which if you focus on it, will maximize the depth of field you get with any given combination of focal length of lens and aperture. This is known as the Hyperfocal Distance - and is approximately 1/3rd of the way into the picture, from where you are standing to infinity. There's another complicated formula telling you what will be sharp, but basically, if you set focus at the hyperfocal point, everything between half way to that point and infinity will be in focus. There is more sensible reading on the subject here.

As good practice, why not experiment with apertures, focal lengths and distance to subject, to see how you can go about controlling the depth of field in your pictures.

Monday, March 19, 2007

Putting It All Together - Exposure

Background
I've already explained the basics of ISO speed, apertures and shutter speeds. Now it's time to put them all together and see how they relate to the overall exposure of an image. The EV or Exposure Value for any given scene and lighting is always a constant.

Theory
The correct exposure for an image is governed by a complicated formula. However, all you really need to know is what effect altering any of the three options has on your pictures. So, for a particular scene and lighting conditions, your camera might suggest this exposure:
ISO 200, 1/250th @ f/5.6
If we were to change the ISO setting to 400, the film or sensor is now twice as "quick" at gathering the same amount of light, so the exposure time can be halved:
ISO 400, 1/500th @ f/5.6
Or, the same amount of light will be let in using 1/250th of a second as before, but decreasing the size of the aperture (increasing the f-number):
ISO 400, 1/250th @ f/8
Assuming we leave the ISO setting as it was originally, the following are also equivalent exposures to the first:
ISO 200, 1/125th @ f/8

ISO 200, 1/500th @ f/4
To see more equivalent values, you might like to look at this interactive EV calculator.

What does this mean for your pictures? Well basically, the combination of shutter speed, ISO and aperture is always a trade-off, depending on your priorities - or what you can change. Sometimes you may have low light and hit the widest aperture of your lens, which will give you slower shutter speeds. If you still want pictures which don't suffer from camera shake, you will need to increase the ISO setting.

Other times, you might have plenty of light (on a sunny day), so use a slow ISO setting, and choose the aperture/shutter speed to either freeze movement (fast shutter speed) or maximise depth of field (small aperture).

Examples
Here are some shots I took of the moon, in October 2004. With this sort of subject, you often don't know what will be the "correct" exposure, so by keeping two of the three parameters the same, and just changing the third, you can bracket the exposure to see which is best.

In this case, I used ISO 200 (to preserve fine detail) and the lens was set at it's widest aperture, f/5.6. The only option left was changing the shutter speed accordingly. Apart from the blue hue, see what effect this has on exposure:

1/250th

This version looks a little bit too bright, it's overexposed.

[1/250th @ f/5.6 with ISO200 - overexposed. Loss of detail in the highlight areas, bottom right]

1/400th

This version looks about right, it's correctly exposed.

[1/400th @ f/5.6 with ISO200 - nicely exposed. Enough detail in the highlights and shadows]

1/640th

This version looks a little bit too dark, it's underexposed.

[1/640th @ f/5.6 with ISO200 - underexposed. Loss of detail in the shadow areas, centre]

As good practice, why not take a few pictures of the same subject, but using a combination of different shutter speeds, apertures and ISO settings. Change one at a time and take a series of shots, then see what effect this has on your subject, and the way the camera records it.

Sunday, March 18, 2007

Photographic Tutorials

Sheila had a good idea, to collect the titles/links of my tutorials on photography, initially written for BarCampLondon2. I'll also be updating the list regularly when I post a new photography tutorial, so you can easily keep tabs on them.

Taking Better Pictures
These were the posts which formed my presentation at BarCampLondon2. They are aimed at anyone who would like to improve their photography, whether they use a fully-automatic compact camera or SLR. The principles apply equally to film and digital photography.
Getting Technical
These are aimed at people with a bit of photographic knowledge, but would like to learn more about the technicalities. They will explain the affects of ISO speed, shutter speed, apertures and more.
How To Take...
These are a few tips on how to handle particular photographic situations, with examples showing how best to get the picture you want.
Please get in touch by leaving a comment if you would like any other aspect of photography explained.

All About Shutter Speeds

Background
The shutter speed is the amount of time that the film or CCD sensor is exposed to light, also known as the exposure or exposure time.

Theory
Shutter speeds are normally quoted in fractions of a second, written as eg. 1/30, which would mean one thirtieth of a second. Like apertures and ISO speeds, they normally follow a standard pattern:
1/1000th, 1/500th, 1/250th, 1/125th, 1/60th, 1/30th, 1/15th etc.
This list runs from shortest/fastest (1/1000th of a second) to longest (1/15th). Some cameras will take shorter exposures (perhaps up to 1/8000th of a second). Longer shutter speeds are often written with the following notation:
0"5, 1", 1.5", 2" ... bulb
This means half a second, one second, etc. BULB is a special case, usually only available withe some SLR cameras, which basically means the shutter is held open for as long as you hold your finger on the button (known as Bulb from an old sort of cable release, with an air tube and bulb at the end, which was used to fire the shutter). Not all cameras will display the shutter speed they are using in the viewfinder, but most SLRs should. They usually just show the portion under the dividing line, so 1/500th would be displayed as 500 in the viewfinder.

Examples
What does this mean for your pictures? Here are some advantages and disadvantages of two extremes of the shutter range:

1/1000th
  • Best in sunny conditions outdoors
  • Good at freezing movement in water or moving objects such as racing cars
  • Unlikely to result in blurred pictures due to camera shake
  • Usually requires the use of the lens's largest aperture setting, eg f/4
[1/400th at f/8 with ISO200 - the water droplets are distinct and the main flow from the gargoyle's mouth breaks up at the end. An even higher shutter speed (1/1000th) would have frozen the droplets even better]

1/15th
  • Better in dull conditions - overcast days or indoors without flash
  • Good at portraying movement lines, such as flowing water, fireworks
  • Prone to unwanted blurry pictures if not using a tripod or Image Stabilised lens
  • Can be used with higher aperture settings in bright conditions, eg f/16
[1/30th at f/32 with ISO200 - the water droplets blur into lines showing their flow. An even longer shutter speed (1/10th) would have made the movement lines even more obvious]

Usually, camera shake (unintentional movement blur) due to long exposure times is unwanted. But you can use a slow shutter speed and deliberately move the camera to make some abstract patterns:

[Thames Impression IV - 1 second at f/5.6 and ISO800. The camera was deliberately moved during the exposure time]

As good practice, why not turn your camera to TV (shutter-priority) mode and take a few pictures of the same subject, but using different shutter speeds. This will show you exactly what the effects of controlling the exposure time can do for your photographs.

Tuesday, March 06, 2007

All About Apertures & F-numbers

Background
What is meant when referring to the "aperture" (or f-numbers) of a lens?

Photographic lenses contain an iris, made up of solid vanes, built in a similar pattern to those on the left. The vanes can move in and out, thus making the central hole larger or smaller - and so letting more or less light through the lens. This is what's called the aperture, and is a guide to the speed of the lens.

The f-stop, (f-number) or aperture is not an absolute number, it's also related to the physical diameter of the lens. So we can compare the relative apertures of a small compact camera's lens with that of a large telephoto, and still get a sense of which is better at gathering light.

Theory
The main series of f-numbers goes as follows (a sequence of root 2): f/1.8, f/2, f/2.8, f/4, f/5.6, f/8, f/11, f/16, f/22, f/32

This seems rather complicated and counter-intuitive at first, but the basic thing to remember is this:
lower f/number = larger hole = faster lens = better in low light
higher f/number = smaller hole = slower lens = better in bright light
Most SLR lenses will have their maximum aperture written on the side. This is the largest size of the hole, when the iris is fully retracted.

More expensive lenses will have a lower f-number, such as f/2.8, which means they have a larger maximum aperture - and will be better for taking photos in low-light conditions.

Things get complicated with zoom lenses - which often have a different maximum aperture at each end of the zoom range, eg. 28-105mm, f/4-5.6. This is saying:
at 28mm end, max aperture is f/4
at 105mm end, max aperture is f/5.6 (ie smaller than f/4.5)
How this affects your pictures - Depth of Field
The other thing which needs considering at this point, is something called Depth of Field. This means what proportion of the image is sharp, in front of and behind the actual point where you focus. I will cover depth of field more fully in another post, but for the purposes of apertures, in general, we need to remember the following:
lower f/number = smaller depth of field = less of image in focus
higher f/number = larger depth of field = more of image in focus
Examples
Let's compare the effects of using two extremes of f/number:

f/2.8
  • Large aperture
  • Good in overcast or low-light conditions
  • Will tend to require using faster shutter speeds
  • Smaller depth of field - less of the overall image in focus
  • Better for portaits or closeups, because backgrounds become blurred and do not intrude
[large aperture - in low-light conditions, giving small depth of field (only the first couple of blooms are in focus). The background is unobtrusive]

f/16
  • Small aperture
  • Good in bright, sunny conditions
  • Will tend to require using slower shutter speeds
  • Larger depth of field - more of the overall image in focus
  • Great for landscapes, where you want everything, from a few meters to infinity, to be sharp
[small aperture - in sunny conditions, giving a large depth of field (almost everything is sharp), great for landscape work]

As good practice, why not turn your camera to AP (aperture-priority) mode and take a few pictures of the same subject, but using different aperture settings. This will show you exactly what the effects of controlling the aperture can do for your photographs.

Monday, March 05, 2007

All About ISO

Background
In the early days of film photography, the International Organization for Standardization (ISO) defined a standard to determine how sensitive the film was to light. This was known as the ISO speed. It is still relevent in digital photography today - the ISO equivalent speed is still a measure of how sensitive the CCD inside the camera is - and thus how quickly it will capture the image it "sees" through the lens.

Theory
ISO speeds normally follow the pattern: 50, 100, 200, 400, 800, 1600. A "slow" ISO speed is at the lower end, ISO 25, 50 etc. A "fast" ISO speed would be 800 or 1600. Most digital compact cameras work in the 100-400 range, although some go higher. Most digital SLRs will work in 100-1600, and some can even cope with 50-3200.

Examples
What does this mean for your pictures? Here are some advantages and disadvantages of two extremes of the ISO range:

ISO 100
  • Best in sunny conditions outdoors
  • Gives good colour saturation
  • Best at recording high-contast scenes
  • Images have good definition (sharpness)
  • Shadows and highlights reproduced in good quality
  • File size (for JPGs) will be lower - more images on a memory card
  • Leads to slower shutter speeds - can cause camera shake (blur)
[ISO100 - there is good colour saturation and sharpness in the picture]

ISO 1600
  • Best in dim conditions - overcast days or indoors without flash
  • Gives reduced colour saturation
  • Best at recording low-contrast scenes
  • Images have reduced definition (sharpness)
  • Shadow areas likely to suffer from ISO "noise"
  • File size (for JPGs) will be higher - fewer images on a memory card
  • Leads to higher shutter speeds - often avoiding blurry pictures
[ISO1600 - there is less colour saturation and sharpness in the picture]

In the above images, I have not done anything to alter the quality apart from cropping and resizing for the web. But this doesn't show the full story - here's a full-size comparision between the photos - showing the centre portion round the doorway:

[Left, ISO100 - good quality, colours and sharpness. Right, ISO1600 showing poor shadow detail and lots of "ISO noise"]

Of course, these effects go gradually from one end to the other as you go through 200, 400 and 800. It's always a trade-off between being able to take (any) picture (in dim conditions) and the technical quality that will result from using a high ISO speed. And the beauty of digital is that you can change the setting from one shot to the next if you need to - in the days of film, you were stuck with it for the whole roll!

So, if your camera will let you set the ISO speed manually, why not have a go at experimenting with different speeds next time you are out shooting? You will then learn what gives you the best results in various lighting conditions.